The translation was generated automatically and may contain mistakes
Callback API
Callback API It is a tool for tracking user activity in your VKontakte community.. With it, you can implement things like:
- •A bot for sending instant responses to incoming messages.
- •Automatic content moderation system.
- •A service for collecting and processing audience engagement indicators.
To start using the Callback API, connect your server in the community settings and select the types of events you want to receive, such as new comments and new photos.
When a community event of the selected type occurs, the VKontakte will send a request to your server with data in the format JSON with basic information about the object that caused the event (for example, an added comment).
In response to each event notification, your server should send a string
ok.
You no longer need to regularly repeat API requests to keep track of updates — you’ll now get them instantly.
Working with the Callback API
Connecting the Callback API
- 1.
Open the vk.com and go to the community where you are an administrator.
- 2.
Select the menu on the right.. Management and then Working with API .
- 3.
Open the tab Callback API .
Next, you need to specify and confirm the final address of the server where all requests will be sent. You can connect up to 10 servers for the Callback API, set each of them a separate set of events and an API version.
After specifying the server address and clicking on the button to confirm the address you specified, a request will be sent with a type notification confirmation . Your server needs to return a given string.
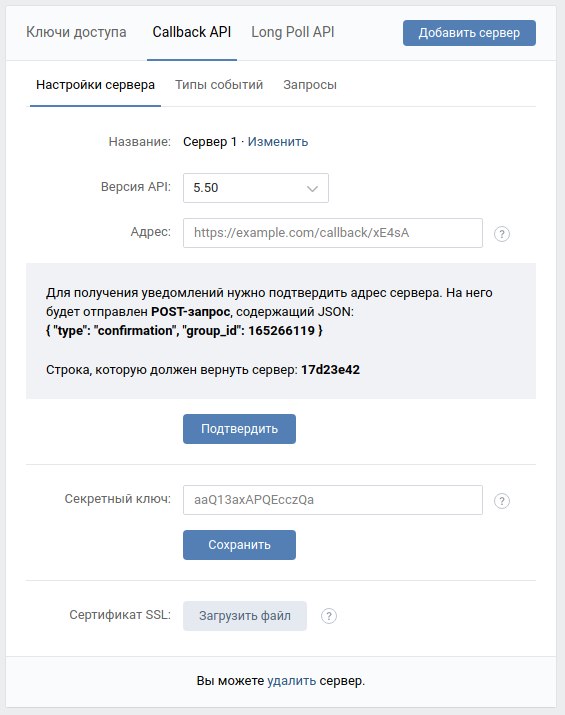
Please note: The confirmation string changes from time to time. If you add a new server or edit the settings of the old one, you need to specify a new confirmation line. You can get a confirmation string using the method
groups.getCallbackConfirmationCode. It can also be seen in community management.The confirmation string that the method returns can only be used to configure the server using the API. In the settings of your community on the VKontakte site, the code will be different.
Once the server address is confirmed, notification settings will be available to you.
In the tab Queries You will be able to see the history of events and the content of requests sent to your server.
Please note: After receiving the notification, your server must return the string
okThe HTTP status is 200. If the server returns an error several times in a row, the Callback API will temporarily stop sending notifications to it.
You can also add, delete and edit servers for the Callback API using section methods.. groups .
Removing the server
To delete the server, you can send a string remove in response to notification of any event.
API version
Depending on the version specified, objects in events will have a different format. You can see the differences between the versions on this page .
The secret key
In the field The secret key you can specify an arbitrary string that will be transmitted in the notification to your server in the field secret .
SSL certificate
To ensure data transfer security, we recommend downloading an SSL certificate in your community’s Callback API settings.
Details of the certificate are given below.
Configuring through the API
You can manage the Callback API settings in your community not only in the web interface, but also with the help of API methods:
- •
groups.addCallbackServerAdds a Callback API server to the community; - •
groups.deleteCallbackServerRemove the Callback API server; - •
groups.editCallbackServer— edits the Callback API server data; - •
groups.getCallbackConfirmationCode— receives a confirmation code to connect the Callback API server; - •
groups.getCallbackServersGets a list of connected servers in the community; - •
groups.getCallbackSettingsReceives event settings for the Callback API server; - •
groups.setCallbackSettingsSets event settings for the Callback API server.
Changing the API version
Format of data sent It may change depending on the API VKontakte . If the format is different than expected, an error may occur when processing the incoming message.
To avoid an error, specify the expected version of the VKontakte API that the platform will use to communicate with your server. You can specify the version of the API via the VKontakte user interface or using API methods.
Through the user interface
- 1.
In the menu on the right, select Management , then Working with API .
- 2.
Go to the tab Callback API and in the section Server Settings Select the API version.
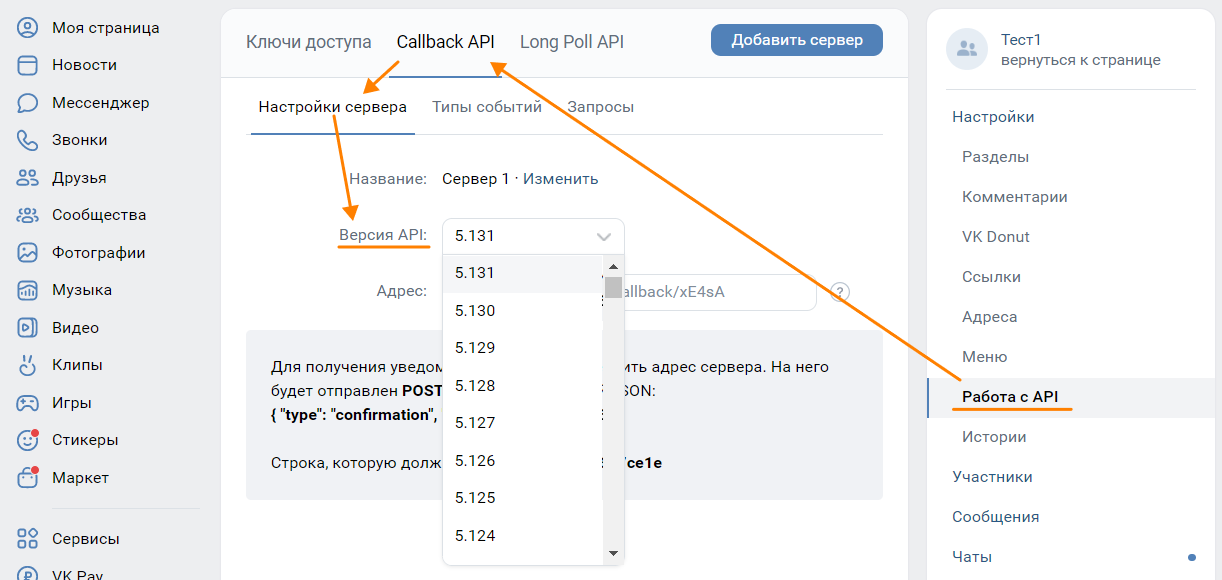 Select version of API VKontakte
Through the API VKontakte
Use one of the following methods:
- •
Send an API Request groups.setCallbackSettings .
Specify the desired version of the API in the parameterapi_versionthis request. Specify the version number as it appears in the UI in the dropdown in the tab Callback API .or - -
- •
Give the desired API version number in response to any request that came through the Callback API channel. In response, use a string of the form:
version 5.131Notice the space after the word
version.Specify the version number as it appears in the UI in the dropdown in the tab Callback API .
The version is supported
5.81and later.
HTTP headers
X-Retry-Counter
The X-Retry-Counter header returns if a previous attempt to send an event failed (for example, due to your server not sending a string ok in response to notification of the event).
The header contains information about the number of failed attempts.
Промежутки времени, через которые событие будет отправлено повторно:
- •the first in 10 seconds,
- •2nd in 3 minutes,
- •Third, in 10 minutes..
- •The fourth in 30 minutes..
- •5th in 1 hour.
Retry-After
You can send a Retry-After header along with HTTP codes 410 , 429 or 503 and the interval of time at which it will be necessary to repeat the request. Specify the time in seconds or in format HTTP-Date . The transfer time should be less than 3 hours.
Pay attention! The actual time of sending the notification of the event may be more than indicated.
Data Format
When an event occurs, you receive data in a JSON that has the following structure:
{
  "type": <тип события>,
  "event_id": <идентификатор события>,
  "v": <версия API, для которой сформировано событие>,
  "object": <объект, инициировавший событие>,
  "group_id": <ID сообщества, в котором произошло событие>
}
For example:
{
  "type": "group_join",
  "event_id": 12345,
  "v": "5.131",
  "object": {
    "user_id": 1,
    "join_type": "approved"
  },
  "group_id": 1
}
Types of events
Structure of the object in the field object It depends on the type of notification. You will find the full list of events.. on this page .
Example of use
In our example, a PHP script handles notifications of a new message and sends a response to its author on behalf of the community.
<?php
if (!isset($_REQUEST)) {
    return;
}

//Строка для подтверждения адреса сервера из настроек Callback API
$confirmation_token = 'd8v2ve07';

//Ключ доступа сообщества
$token = 'c0223f775444c....9c0a1';

function vk_api($method, $params, $token) {
    $params['v'] = '5.131';
    $url  = 'https://api.vk.ru/method/' . $method . '?' . http_build_query($params);
    $curl = curl_init($url);
    curl_setopt($curl, CURLOPT_RETURNTRANSFER, true);
    curl_setopt($curl, CURLOPT_HTTPHEADER, [
        'Authorization: Bearer ' . $token,
    ]);
    $json = curl_exec($curl);
    curl_close($curl);
    return json_decode($json);
}

$data = json_decode(file_get_contents('php://input'));

//Проверяем, что находится в поле "type"
switch ($data->type) {
//Если это уведомление для подтверждения адреса...
    case 'confirmation':
//...отправляем строку для подтверждения
        echo $confirmation_token;
        break;

//Если это уведомление о новом сообщении...
    case 'message_new':
//...получаем id его автора
        $user_id   = $data->object->message->from_id;
//затем с помощью users.get получаем данные об авторе
        $user_info = vk_api('users.get', ['user_ids' => $user_id], $token);
//и извлекаем из ответа его имя
        $user_name = $user_info->response[0]->first_name;
//С помощью messages.send отправляем ответное сообщение
        vk_api('messages.send', [
            'message'   => "Hello, {$user_name}!",
            'peer_id'   => $user_id,
            'random_id' => 0,
        ], $token);
//?1?’озвращаем "ok" серверу Callback API

        echo 'ok';
        break;
}
Support in SDK
You can use the Callback API with our SDKs:
What is an SSL certificate
SSL It is a protocol that allows you to protect the requests that your server receives from substitution, interception and modification by a third party. To work SSL on the server that receives the request, and on the client that sends it, there must be special digital certificates — their presence (and correspondence to each other) allows you to install a secure system.. HTTPS ) the connection.
By downloading the client certificate file (in the format PKCS#12 , together with the private key) in the interface Callback API Having configured your server to work with this certificate, you can be sure that the notification came from our service - without having a key from the certificate, it will be impossible to fake such a request or intercept it. This mechanism is called certificate authentication.
We recommend that you read these articles before starting work, if you have not previously dealt with authentication on the web, and do not yet know what an SSL certificate is:
- •
- •
The server certificate must be issued by an authorized certification authority — its validity will be checked on the VKontakte side.. The client certificate for the Callback API can be self-certified, the instructions for its creation we have placed for you on this page. You can use the client certificate with any level of validation, on our part there are no specific requirements for the conditions of its issuance. It is only necessary that your server supports the work with the certificate of the selected type and can check its availability and compliance with your access settings.
To create a certificate, you will need to use OpenSSL. You can install this program by one of the links from official website . We strongly recommend that you generate a separate certificate for the Callback API and not use a certificate created for another service for this purpose.
Creating a client-side self-signed certificate in OpenSSL
To create a certificate, type this command:
openssl req -newkey rsa:2048 -sha256 -nodes -keyout vkapi.key -x509 -days 365 -out vkapi.crt -subj "/C=RU/ST=Saint Petersburg/L=Saint Petersburg/O=VK API Club/CN=vkapi"In our example, the following parameters are used:
req - means a request for the creation of a new certificate;
-newkey rsa:2048 A new closed RSA key with a length of 2048 bits will be created. The length of the key you can configure at your discretion.
-sha256 — used hash Algorithm (We recommend using this value).
-nodes indicates that the private key does not need to be encrypted.
-keyout vkapi.key indicates that the private key must be stored in a file with the name vkapi.key .
-x509 — indicates that you need to create a self-signed certificate.
-days 365 — indicates the period of validity of your certificate (in this case, one year).
-out vkapi.crt indicates that the certificate must be saved in a file with the name vkapi.crt .
-subj "/C=RU/ST=Saint Petersburg/L=Saint Petersburg/O=VK API Club/CN=vkapi" Data from your certificate:
- •
Ccountry code (consisting of two letters); - •
STthe region; - •
LThe city; - •
Othe name of the organization; - •
CNCommon Name, the name of the certificate (for a client certificate, it can be arbitrary).
You can use values from subj For additional identification of the certificate, arbitrary data are allowed in this parameter. For example, you can check on the server side that the string you’ve set is being passed to CN.. vkapi ).
After executing the command, two files will appear in the OpenSSL directory — vkapi.key containing the private key, and vkapi.crt containing the certificate. You need to convert them to format.. .p12 .
Exports to PKCS#12
To convert the certificate to PKCS#12, use the following command:
openssl pkcs12 -export -in vkapi.crt -name "Test" -descert -inkey vkapi.key -out vkapi.p12
Parameters from our example:
pkcs12 — means working with files in PKCS#12;
-export request for export of the certificate;
-in vkapi.crt - indicates the input file;
-name "Test" the user name;
-descert - encryption of the certificate in 3DES;
-inkey vkapi.key - indicates the name of the file containing the private key;
-out vkapi.p12 indicates that the result should be saved in a file with the name vkapi.p12 .
After executing the command, a file will appear in the OpenSSL directory vkapi.p12 . This is the one you need to download VKontakte> Open the section for that. Management , then Working with API , tab Callback API . Press Select the file Select a file on your computer.
Server Configuration
Pay attention! Your server must have a root SSL certificate signed by an authorized certificate authority. A self-signed root certificate is not enough to work with the Callback API. You can get a certificate, for example, using this site: https://letsencrypt.org
You also need to further configure your server to be able to authenticate using the client certificate you created earlier.
In Nginx, all you need to do is add the following directives:
ssl_client_certificate /path/vkapi.crt;

ssl_verify_client on;

ssl_verify_depth 0;
here:
ssl_client_certificate the path to the client certificate file on your server;
ssl_verify_client Checking the customer certificate;
ssl_verify_depth Depth of verification of the client certificate chain.
If you have not previously had to deal with setting up client certificates for your server, we recommend reading these articles:
- •
- •
- •